Hey Copilot!
Published on
So, you’ve got an idea of a new app or a web site, that you wish to build with GitHub Copilot.
You have a design and architecture in mind, you’ve got some requirements ready, and now it’s time to bring your vision to life. How to set yourself up for success and let Copilot do the job for you?
In this post I’ll share my approach to harnessing GitHub Copilot Agentic capabilities effectively.
Prerequisites
Get your VS Code Insiders ready for the best and latest experience. Get your GitHub Copilot subscription and latest updates.
After that, go ahead and run mkdir your-project, step into it with cd your-project, git init and code-insiders . to get started.
Setting Up Your Project
Whatever tech stack you choose, you may ask Copilot with scaffolding. For this example, I’ll ask it to build a TypeScript, Next.js application.
I expect to have some npm create next-app@latest --ts command to set up the project.
Planning
At this point you can just type your prompt into a chat and ask Copilot to build you the app, but we probably want to have more control over the process. Here comes the planning and configuration stage.
My usual approach is to create a set of md files in the /docs folder, that will contain requirements and instructions for the Agent to follow.
I typically start with project outline, by typing my idea as a free text into Copilot Chat in Ask mode using one of the larger models (Opus 4 or GPT-5), ask it think about it, and give me clarifying questions. With a few iterations, where we collaborate and refine the requirements, I end up with a solid foundation to work from.
After that I switch to Agent Mode and ask Copilot to summarize our discussion and create a detailed project overview.
The next step, similar iterations but for architecture and UI guidelines.
I expect to end up with the following structure:
📁 docs
├── architecture.md # architecture, project structure, tech stack
├── overview.md # project overview, goals, and objectives
└── ui-guidelines.md # UI components, design patterns, color schemes
Copilot Instructions
Once we have our docs ready we can start configuring Copilot.
If we do nothing here, our Agent would still be able to pick up patterns and make some descisions on its own, but we want to be more prescriptive and limit its creativity to a certain extent.
Be it a new project or an existing one, we should always set up copilot-instructions.md file in the .github folder. This file will be attached as a context to every prompt we send to Copilot, here I typically document basic rules and information about my project.
The goal is to help the model to understand how I expect it to generate code, where to find relevant information and what steps I consider important.
To start off, we can use a built-in instructions generation prompt:
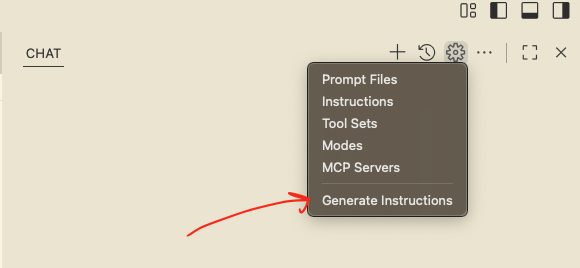
Copilot will scan the repo, and generate a decent set of instructions based on the project structure and documentation.
Don’t forget to add links to the files in the /docs folder, so the model can easily reference them during the code generation process.
## Documentation
- **Architecture**: `docs/architecture.md`
- **Overview**: `docs/overview.md`
- **UI Guidelines**: `docs/ui-guidelines.md`
Since I’m building a web app, I also document the build and lint process
Always run the following commands before completing a task:
- `npm run build` to ensure the project builds successfully.
- `npm run lint` to ensure code quality and consistency.
- `npm test` to ensure all tests pass.
This will ensure that Copilot is not getting lazy and taking any shortcuts.
Custom Instructions
In addition to copilot-instructions.md, that, as I already mentioned is attached to every prompt, I also create custom, file-specific instructions for Copilot.
They are placed in .github/instructions/**.instruction.md
Custom Instruction files use this format:
---
applyTo: "src/**/__tests__/**,**/*.test.ts,**/*.test.tsx,**" # pattern to match files to apply these instructions
description: "Testing layout and setup"                      # description of the instructions purpose
---

## Base Rules

- Use Jest.
- Unit tests are placed in `__tests__` subdirectories.

## Examples

<!-- Add a unit test example, so that Copilot follows existing patterns -->
In these files we should codify desired patterns, DOs and DON’Ts, coding conventions, and any other relevant information that will help maintain consistency across the codebase.
Summary
As a rule of thumb, we can treat copilot-instructions.md as a root file for Copilot agent.
It shouldn’t be too large, especially when your code base grows. Think about it as a tree structure, that would improve readability and maintainability.
copilot-instructions.md # Contains basic instructions and links to use case-specific documentation
├── architecture.md # architecture, project structure, tech stack
├── overview.md # project overview, goals, and objectives
├── build.md # project build process
├── build.md # project build process
└── ui-guidelines.md # UI components, design patterns, color schemes
I recommend keeping it up-to date (e.g., after major refactoring, adding new features, or changing existing patterns).
Custom Instructions should be more granular and focused on specific files or modules. They on opposite, can be quite detailed and prescriptive.
📁 .github
 └──📁 instructions
    ├── typescript.instructions.md # TypeScript coding guidelines
    ├── tests.instructions.md # Testing frameworks, patterns
    ├── css.instructions.md # CSS coding guidelines
    ├── backend.instructions.md # Backend development guidelines
    ├── database.instructions.md # Database development guidelines, migration rules, cli commands
    └── github-actions.instructions.md # GitHub Actions workflow guidelines
Pretty much every aspect of code generation can and should be codified. This way we can make our Agent generate consistent code that meets our standards and does not deviate from established patterns. You know, we want no surprises, after all.
Automation
I know, it sounds like a lot of work, and it’s not easy to get started. What makes a good instruction after all?
Here are some tips:
- Start with something, whatever you think it important, place it there
- Write some code yourself, the way you want it to be written
- Ask Copilot to rewrite instruction files by providing it with examples, it’ll do a good job
- Iterate! Did you ask Copilot to fix its code? Don’t forget to ask it to update instructions too. They are its long-term memory!
Coding Time
Well, now our project is ready.
I usually follow Plan-Refine-Act-Review cycle.
Plan
For planning I use larger models in Ask Mode, provide it with my feature description and requirements and ask it to generate a detailed implementation plan.
Refine
With a brief back and forth interations, where I tell copilot to ask clarifying questions, I can shape the plan to my liking.
Act
When I’m happy with the plan, I switch to Agent Mode, pick a model that does well with coding (today it would be Sonnet 4 or GPT-5 for large features, more light-weight models for simple tasks) and tell it to proceed with the plan. At this stage it doesn’t require a lot of steering and control.
Review
This is a time for me to review the code (I look at it myself, but also ask Copilot to review changes and pay attention to the architecture, data flow, performance and best practices).
And that’s it, if I’m satisfied with the results, I can commit and push.
Final Thoughts
Models and Agentic capabilities are pretty powerful at this point, but with the right setup and configuration we can make them do exactly what we want and force them to produce the code that meets our expectations. Having these guidelines helps us keep Copilot on track.
Ever increasing complexity of agentic tools requries us to learn more about them and spend some time preparing before we can start. It’s the current reallity. But the time invested pays off!
I hope these tips will help you get started and set your new project up for success.
Happy coding!
Disclosure
I’m employed by GitHub at the time of writing this post. All opinions are my own.