Sharing ReSharper settings and Live Templates
Published on
In my previous post I’ve described how to create your own Live Templates for ReSharper. Today I’m going to tell how to share your ReSharper settings and Live Templates with your team.
All the plug-ins for ReSharper are regular NuGet packages. That means that we can pack and publish it to the official ReSharper NuGet feed or to your own company’s private feed (in case you want to keep it away from the rest of the world).
Exporting settings
Go to RESHARPER->Manage Options menu.
Select the settings layer, which you would like to export.
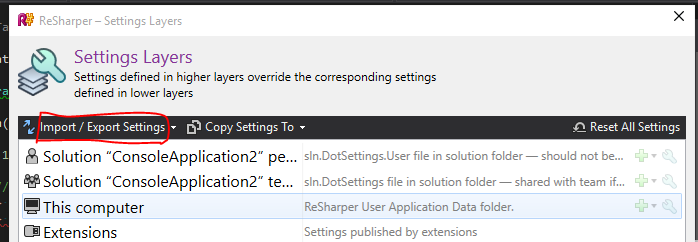
Click Import/Export settings
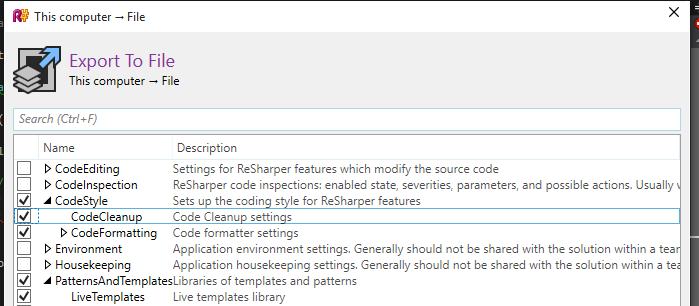
In the Export To File dialog window select Code Style and Live templates tree nodes. Then choose the directory and file name for your DotSettings file.
Creating NuGet package
Once the settings file is exported to the Settings folder we might want to create a NuGet package. The .nuspec file for ReSharper 8.2 looks like the following:
<?xml version="1.0"?>
<package>
  <metadata>
    <id>YourCompany.Settings</id>
    <version>1.0.0</version>
    <title>TeamSettings</title>
    <authors>Your name</authors>
    <owners>Your Company</owners>
    <projectUrl>http://your-company.com</projectUrl>
    <requireLicenseAcceptance>false</requireLicenseAcceptance>
    <description>
      Team settings and live templates for ReSharper
    </description>
    <copyright>Copyright © Your Company</copyright>
    <dependencies>
      <dependency id="ReSharper" version="8.2" />
    </dependencies>
    <releaseNotes>
    </releaseNotes>
    <tags>settings</tags>
  </metadata>
  <files>
    <file src="..\Settings\" target="ReSharper\v8.2\settings\" />
  </files>
</package>
If you use ReSharper 9.1 the .nuspec file is slightly different. Dependencies node should specify the “Wave” version, not the ReSharper version.
<dependencies>
      <dependency id="Wave" version="[2.0]" />
</dependencies>
And due to the changes in the R# plug-in system you should provide target in a different way:
<files>
    <file src="..\Settings\"
    target="DotFiles\Extensions\YourCompany.Settings\settings\" />
  </files>
Where “YourCompany.Settings” is a NuGet package id.
To build the package we need the command line tool NuGet.exe
Ok, now we’re ready to execute the command:
nuget.exe pack nuspec-file-name.nuspecIf everything is set up correctly you will get the “YourCompany.Settings.1.0.0.nupkg” file as an output.
Publishing NuGet package
As I mentioned before ReSharper can consume four different NuGet feeds.
- Official plug-in feed from JetBrains
- Any custom in-house NuGet server (like ProGet)
- TeamCity artifacts feed
- Local or shared network file system directory
Publishing the plug-in to the NuGet server is a straightforward process and typically it’s the same as publishing the regular NuGet package to the NuGet.org web site.
NB. ReSharper is not so good when it comes to NuGet feed with authentication.
For the demo purpose I’ll use the file system. Just place the .nupkg to the folder which is accessible from every team member’s computer.
Using custom NuGet feed
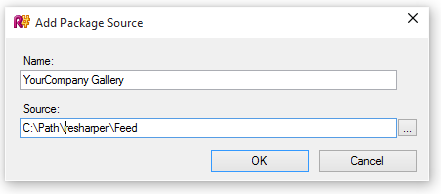
Once the package is published go to RESHARPER -> Options…->Environment -> Extension Manager.

Click Add and enter any name you want for the Name and the path of the Artifacts, NuGet feed or directory for the Source.
Installing the extension
In Visual Studio go to RESHARPER -> Extension Manager
Search for the package name, select the package with settings and click Install.
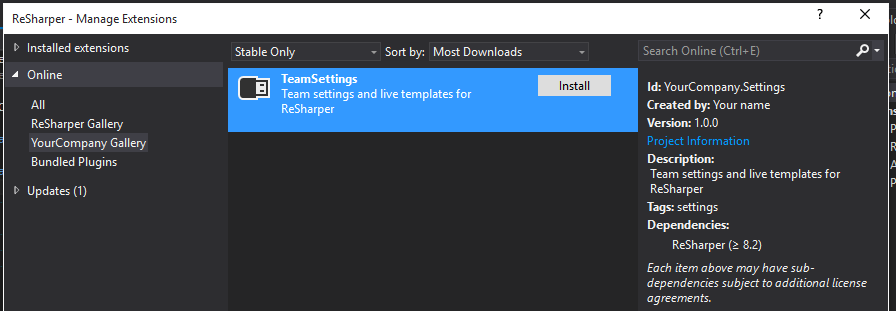
If we check the Manage Options dialog we’ll find the new settings layer.
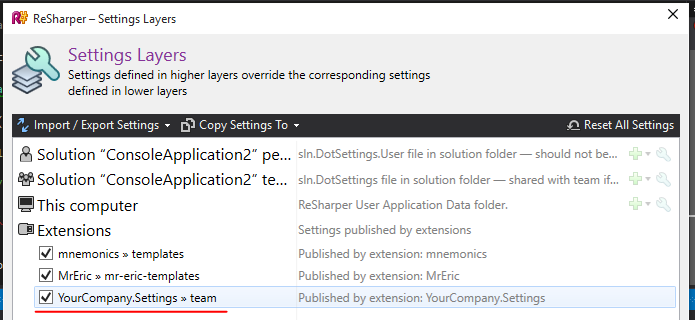
Every team member now can use the same version of formatter settings. Since we distribute them as an extension ReSharper will automatically show a notification when a new version is available.